Thursday, November 22, 2012

It's a Salem's Lot Thanksgiving Charlie Brown


Happy Turkey-Day.  I'm sure everyone knows the critical role that vampires played in the first Thanksgiving. From teaching the pilgrims how to cultivate corn and survive in a hostile wilderness to participating in the storied feast, the undead were there every step of the way...

Is anyone buying this? Hmm, I thought not. Suffice it to say that I'm one holiday behind.


This old Grenadier mini was slated to appear in October along with a wight as part of Otherworld's ongoing painting pledge. The Wight made it, the vampire didn't. In the hope of rectifying this sorry state of affairs, here is the pair as intended:
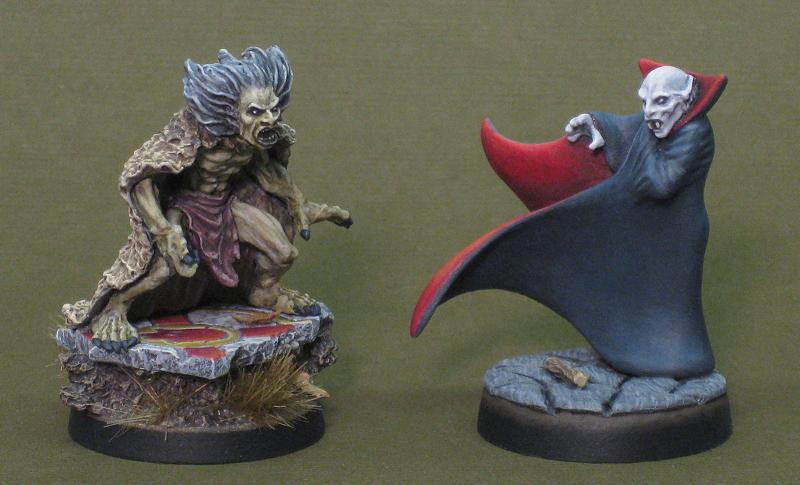

See that? A miniature world premiere right here on Minisbyfinch. Now you truly have cause to give thanks.

You're welcome. Glad to be of service.

Anyhow. Briefly returning to reality, a few notes are in order before awaiting the inevitable flood of gratitude by way of the comment section.

Skin tones: I wanted to depart from my previous efforts in the undead arena. Both minis began with a shaded basecoat. For the wight I then used Reaper's Moldy Skin, shaded with Secret Weapon's Sewer Water wash and highlighted by adding Reaper's Linen White to the mix. The vampire's base skintone started with a mix of Privateer Press' Carnal Pink and Reaper's Military Blue. More of the blue was added for the shadows while the highlights are Army Painter's Matt White with just a touch of the pink. Glazing was used extensively on both.

Bases: I sculpted the vampire's base myself. The wight's is an insert from Dark Age Games wet sanded and carved so as to fit on a standard 25mm base. This was done in large part to fit the mini onto a 25mm base rather than the 30mm one that Otherworld provides. The nails on the right foot were bent so they droop over the edge of the stone. The wight and his base were painted separately.


Together again: The wight joins his blister-mate that was completed some time ago. The record still goes to the vampire though; he's actually been sitting, prepped and based, in the lead-pile for many years. A priming mishap caused me to put him aside in disgust for all that time.


Faded Glory: There's an awful lot I don't know about digital photography. I greatly reduced the exposure to photograph the vampire due to his very pale skin. In so doing the wight wound up looking much better than in earlier pics. Must remember this in the future.

Monday, October 15, 2012

Kickstarter Fatigue & Fungi On Parade

Is it just me or has the current crop of crowd-funded miniatures projects hit epidemic proportions? Until recently I was blissfully unaware of the entire concept of crowd funding. Now, having dipped my toes into the Kickstarter pond, some restraint is in order lest I fall in and drown. This could get real expensive real quick I fear.


That said, two ongoing projects have caught my attention big time. The first is Otherworld's Dungeon Adventurers on Indiegogo (no surprise there). The second is Paymaster Games' Going Native: Warpath. Paymaster's offering is intriguing given its focus on Pre-Colombian America and the Pacific and especially due to the inclusion of mythological creatures from those same cultures. I'm a monster junkie. The prospect of an orca/wolf hybrid or an ahuizotl (think otter/pit bull/monkey with a gift for vocal mimicry and an extra hand) is too good to pass up. So far the artwork and greens look great.

Speaking of things that are sprouting up like mushrooms, my latest completed project for OW's painting challenge consists of a violet fungus (OW), two shriekers (OW), and a subterranean druid with bad skin (Fantasy Flight Games):


All four were finished using a technique that I picked up from kingsminis where each was primed grey, washed black, drybrushed grey and then white, and only then painted with colors heavily thinned with GW's Lahmian Medium.

The druid was an attempt to try out some things that might transfer well to painting undead. The results were mixed: Really subtle shading without the use of washes combined with some nasty graininess in spots (clumped paint residue from the drybrushing?). This guy is done but the technique is still a work in progress.

Curiously, the shriekers avoided any such problems. Here is a time-lapse of sorts showing one progressing through the various stages. The top row consists of Primer, Wash, Grey DB, White DB. The bottom: Thinned Paint (grey over grey may not illustrate the point all that well, but trust me, it's paint), Detailing, and More Detailing/Highlights.


The project also allowed for some sculpting on the bases. Turns out that sculpting fungus with green stuff is an enjoyable way to spend ones free time. Who knew?


Saturday, August 25, 2012

The Hills Have Cankles


An update on the state of project hill giant. I want to finish before September arrives (the giants, not the post). I'll keep it brief so I can return to the painting cave ASAP.

I suffered a setback as a result of my basing. Of late I've been going ever smaller with the size of basing grit in an attempt to get a better in-scale effect. I've also noticed an issue in that I unintentionally wind up removing some of the the grit during the pre-primer wash. With this in mind I washed the giants, applied the grit, and then primed (in that order).

That was a mistake.

Once primed and basecoated it became obvious that a layer of fine dust had been deposited on sections of the mini and that consequently the final product was pretty well ruined.

There seemed no easy remedy so, after much cursing and a fair amount of hesitation, I hit the offending bits with steel wool, fine sandpaper, and a motor-tool equipped with a wire brush attachment. I then gave her a good rinse and re-primed. This greatly improved the state of things but it did take some time.

To paraphrase Ricardo Montalban from The Wrath of Khan: time is a luxury I do not enjoy. The on-schedule completion of the project is in doubt.


On the positive side of the ledger, I've gotten to play around with Reaper's olive skintones that were originally meant for the OW stone giant. I'm pleased with the results thus far.

Much work remains to be done.

Don't even get me started on the current state of the Otherworld hill giant.


Saturday, August 18, 2012

Mean Green Painting Machine


I closed last time with the thought that my next project might be either a hill giant or fire giant. It was idle musing more than a concrete plan but, after some encouragement from Chris at Duke of The Blood Keep and in view of the fact that I really enjoyed working on the stone giant, project hill giant was born.

Not really a project to start. My intent was simple enough; build, paint, and present the Otherworld hill giant as my July painting challenge/pledge entry. I liked the mini "as-is" thereby avoiding my need to "improve" on the efforts of professional sculptors by attacking their work with all manner of tools and green-stuff.

Quick and easy. I would finish my entry early for once.

That was the plan anyway.

Here the first draft of this post went on to detail how my "simple'' task morphed into something unmanageable. Not exactly compelling reading as it turns out. Suffice it to say that my July entry wound up as a dwarf/jackalope/slime combo while August's will hopefully consist of two hill giants (one a heavily converted Reaper mini) and a piece of terrain.

Some pics of the aforementioned July combo for your viewing pleasure:


The jackalope is quite small and sits on a 20mm base. I sculpted the base to match the dwarf's using tools built in accordance with this tutorial. Very handy.


The hill giants are in the works. More on that next time.

Sunday, July 15, 2012

How Grey Was My Stone Giant


Hooray, huzza, and all of that! Project stone giant has come to a successful conclusion. While future generations may mark this day with parades and fireworks, I thought it best to put down my champagne glass briefly and provide some details. This is as much for my own benefit as anything else. A record of how I arrived at the final product will make it easier to add new members to the tribe if circumstances allow. Memory being what it is, I don't want to be scratching my head six months or a year from now, trying to recall what paints I used. A little note-taking never hurt anyone.


My plan was to throw old-school orthodoxy to the wind and paint him with a normal skin-tone and tattoos. (That's right, tattoos.) To this end, I ordered Reaper's olive skin triad and did some research on cave paintings. I found a depiction of a wooly rhino that would look good on his back as well as info on stone age symbols in general. Ooo! The rhino tattoo would tie in nicely with an actual wooly rhino miniature, I thought. As it happens, my extensive lead pile contains just the thing: a honking-great wooly rhino by DeeZee.

So it was settled - a hunter/quarry theme. A decidedly flesh-toned, stone-age stone giant, come down from the mountains to hunt, his skin decorated with tattoos similar to cave paintings. Genius, I tells ya!

By this point you may be wondering why the pictures bear no resemblence to what I"m describing.

The best laid schemes of mice and men (and miniature painters) often go awry. On opening the blister containing the reaper paints, I discovered that it had been mispacked. Two of the colors were wrong. (I really should inspect these things when they arrive rather than waiting until I'm moments away from using them.)

At this point I could: A) Put the project aside until I had the proper paint in hand, B) Use flesh colors I already had, or C) Scrap my original plan and go in a different direction.

I had already committed myself to finishing the mini as part of  OW's painting challenge so "A" was out. "B" didn't work either. I had chosen the olive skin-tone because it borders on a stone color, isn't pink in the slightest, and is light enough to be a good background for tattoos. The paints I had or could get on short notice didn't seem to fit the bill. So "C", "gray or gray-brown" to quote Gygax, looked to be the winner.


 Gray-brown offered the opportunity for some experimentation as it turned out. Pictured above are the paints and additives used in painting the skin. Uniform grey mixed with a little chaos black was used as the base. This was given a wash of fleshtone shade mixed with black shade, then highlighted with glazes of uniform grey and ash grey. Glazes of khardic flesh were then applied overall with particular attention paid to the face, soles of the feet, palms, knees and elbows. Where I overdid the khardic flesh a bit, I went back and toned it down with more grey. The red leather was used on the lower lip.


On the subject of glazing, GW's lahmian medium may be my new best friend. When mixed with a small amount of paint it makes a great glazing medium. Some pretty subtle effects are possible with this stuff.


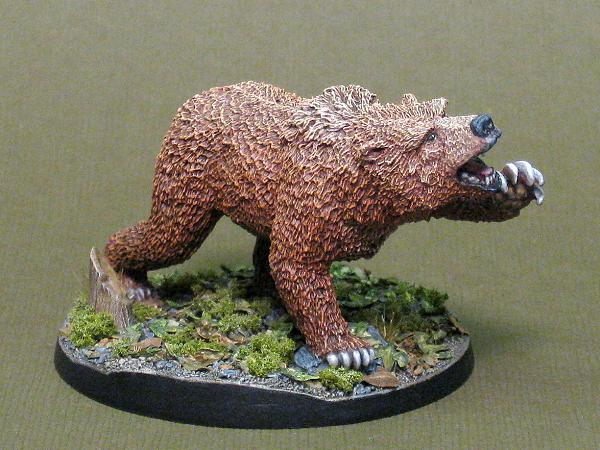
The cave bear was a more straightforward undertaking. Being mostly fur, he received the wash and drybrush treatment for the most part. In an attempt to achieve a more subtle effect, I gradually lightened the drybrushed color as I went higher on the body and did some glazing with the lightest color around his face and muzzle. The real detail painting was reserved for the mouth, eyes, and claws.


That's that. One basic, run of the mill, grey stone giant and his cookie-cutter sidekick. (Yawn.) In the end, I used some of the stone age symbols on the club and bag, and I still have the Olive skintone triad (Reaper made good on their mistake). Might work well on a hill giant I suppose.

I'll have to save my acts of apostasy against the old-school for another day it seems.

I wonder what a brick red fire giant would look like...