My plan was to throw old-school orthodoxy to the wind and paint him with a normal skin-tone and tattoos. (That's right, tattoos.) To this end, I ordered Reaper's olive skin triad and did some research on cave paintings. I found a depiction of a wooly rhino that would look good on his back as well as info on stone age symbols in general. Ooo! The rhino tattoo would tie in nicely with an actual wooly rhino miniature, I thought. As it happens, my extensive lead pile contains just the thing: a honking-great wooly rhino by DeeZee.
So it was settled - a hunter/quarry theme. A decidedly flesh-toned, stone-age stone giant, come down from the mountains to hunt, his skin decorated with tattoos similar to cave paintings. Genius, I tells ya!
By this point you may be wondering why the pictures bear no resemblence to what I"m describing.
The best laid schemes of mice and men (and miniature painters) often go awry. On opening the blister containing the reaper paints, I discovered that it had been mispacked. Two of the colors were wrong. (I really should inspect these things when they arrive rather than waiting until I'm moments away from using them.)
At this point I could: A) Put the project aside until I had the proper paint in hand, B) Use flesh colors I already had, or C) Scrap my original plan and go in a different direction.
I had already committed myself to finishing the mini as part of OW's painting challenge so "A" was out. "B" didn't work either. I had chosen the olive skin-tone because it borders on a stone color, isn't pink in the slightest, and is light enough to be a good background for tattoos. The paints I had or could get on short notice didn't seem to fit the bill. So "C", "gray or gray-brown" to quote Gygax, looked to be the winner.
Gray-brown offered the opportunity for some experimentation as it turned out. Pictured above are the paints and additives used in painting the skin. Uniform grey mixed with a little chaos black was used as the base. This was given a wash of fleshtone shade mixed with black shade, then highlighted with glazes of uniform grey and ash grey. Glazes of khardic flesh were then applied overall with particular attention paid to the face, soles of the feet, palms, knees and elbows. Where I overdid the khardic flesh a bit, I went back and toned it down with more grey. The red leather was used on the lower lip.
On the subject of glazing, GW's lahmian medium may be my new best friend. When mixed with a small amount of paint it makes a great glazing medium. Some pretty subtle effects are possible with this stuff.
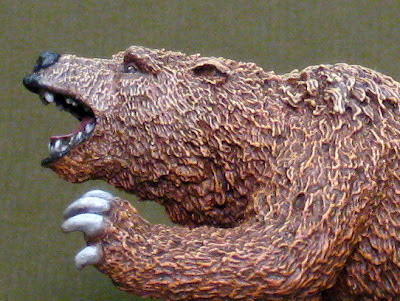
The cave bear was a more straightforward undertaking. Being mostly fur, he received the wash and drybrush treatment for the most part. In an attempt to achieve a more subtle effect, I gradually lightened the drybrushed color as I went higher on the body and did some glazing with the lightest color around his face and muzzle. The real detail painting was reserved for the mouth, eyes, and claws.
That's that. One basic, run of the mill, grey stone giant and his cookie-cutter sidekick. (Yawn.) In the end, I used some of the stone age symbols on the club and bag, and I still have the Olive skintone triad (Reaper made good on their mistake). Might work well on a hill giant I suppose.
I'll have to save my acts of apostasy against the old-school for another day it seems.
I wonder what a brick red fire giant would look like...


Stupendous dude! Now, what are you painting for this month hmmm??
ReplyDeleteThanks Chris. Off to a late start this month but there may be a hill giant in the cards.
DeleteI look forward to it. My Giant Slug made some excellent progress last night and yes... there was a clay shaper and some stippling involved!
DeleteSpectacular job on this, both the conversion and the paint jobs! I wish I had seen yours before I painted mine!
ReplyDeleteThanks Chris. In a way I'm glad I finished mine before I saw yours. I might have gotten in over my head attempting to approximate that cask-carrying stone giant of yours. Fantastic work on your part.
Delete