Showing posts with label How-To. Show all posts

Saturday, April 20, 2013

British Invasion


I need more minis like I need another hole in the head. This undeniable truth didn't prevent me from taking advantage of sales recently run by British manufactures Otherworld and Heresy. I picked up some cool stuff at a good price.

And so the lead pile grows.

One mini, however, has earned the rare distinction of going straight from the package to my workbench; Heresy's cyclops. He has been paired with Otherworld's meazels for this month's painting challenge on the OW forums.


The cyclops comes standard with three different heads. I chose the one I liked best, pinned it in place (after some re-shaping of the neck for a better fit), and applied green-stuff.


The arms were attached followed by more green-stuff. After this cured, I addressed a rough spot in my work with some Tamiya white putty diluted with lacquer thinner followed by a light sanding.


The meazels are one piece castings and therefore much easier to deal with. At least that was the theory.

Upon close examination one of the minis turned out to be miscast. A rope garrote was largely missing. This lead to a crash course in making rope from copper wire. Fiddly work to be sure; not least of all because it was necessary first to remove what remained of the original garrote.


My boiler-plate basing procedure, arrived at through trial and error, was used here. Speaking in general terms, the drill goes something like this:
  • Minis are shimmed with plastic card so they wind up slightly elevated from their bases. This allows for the thickness of the PVA glue used to secure the basing grit and results in a mini that appears to be standing on the ground as opposed to partially buried in it.
  • The tops of any mounting tabs are filed down so that they remain flush with the tops of their bases.
  • I collect the grit myself. I find commercially available products to be both too coarse and too uniform.
  • Once the grit is applied and the PVA dry, a coat of matte varnish is applied to hold everything in place.
  •  Minis are thoroughly washed prior to basing and receive a light rinse before being primed. The second wash is mostly to remove any residual grit that has found its way onto the mini itself. The varnish coat helps to keep everything in place during this step. That said, I still avoid scrubbing the base with my ever-present toothbrush at this point and quickly blot off any residual water with a paper towel. 


So much for generalities. Returning to specifics, I now have four minis awaiting primer and paint:

Sunday, July 15, 2012

How Grey Was My Stone Giant


Hooray, huzza, and all of that! Project stone giant has come to a successful conclusion. While future generations may mark this day with parades and fireworks, I thought it best to put down my champagne glass briefly and provide some details. This is as much for my own benefit as anything else. A record of how I arrived at the final product will make it easier to add new members to the tribe if circumstances allow. Memory being what it is, I don't want to be scratching my head six months or a year from now, trying to recall what paints I used. A little note-taking never hurt anyone.


My plan was to throw old-school orthodoxy to the wind and paint him with a normal skin-tone and tattoos. (That's right, tattoos.) To this end, I ordered Reaper's olive skin triad and did some research on cave paintings. I found a depiction of a wooly rhino that would look good on his back as well as info on stone age symbols in general. Ooo! The rhino tattoo would tie in nicely with an actual wooly rhino miniature, I thought. As it happens, my extensive lead pile contains just the thing: a honking-great wooly rhino by DeeZee.

So it was settled - a hunter/quarry theme. A decidedly flesh-toned, stone-age stone giant, come down from the mountains to hunt, his skin decorated with tattoos similar to cave paintings. Genius, I tells ya!

By this point you may be wondering why the pictures bear no resemblence to what I"m describing.

The best laid schemes of mice and men (and miniature painters) often go awry. On opening the blister containing the reaper paints, I discovered that it had been mispacked. Two of the colors were wrong. (I really should inspect these things when they arrive rather than waiting until I'm moments away from using them.)

At this point I could: A) Put the project aside until I had the proper paint in hand, B) Use flesh colors I already had, or C) Scrap my original plan and go in a different direction.

I had already committed myself to finishing the mini as part of  OW's painting challenge so "A" was out. "B" didn't work either. I had chosen the olive skin-tone because it borders on a stone color, isn't pink in the slightest, and is light enough to be a good background for tattoos. The paints I had or could get on short notice didn't seem to fit the bill. So "C", "gray or gray-brown" to quote Gygax, looked to be the winner.


 Gray-brown offered the opportunity for some experimentation as it turned out. Pictured above are the paints and additives used in painting the skin. Uniform grey mixed with a little chaos black was used as the base. This was given a wash of fleshtone shade mixed with black shade, then highlighted with glazes of uniform grey and ash grey. Glazes of khardic flesh were then applied overall with particular attention paid to the face, soles of the feet, palms, knees and elbows. Where I overdid the khardic flesh a bit, I went back and toned it down with more grey. The red leather was used on the lower lip.


On the subject of glazing, GW's lahmian medium may be my new best friend. When mixed with a small amount of paint it makes a great glazing medium. Some pretty subtle effects are possible with this stuff.


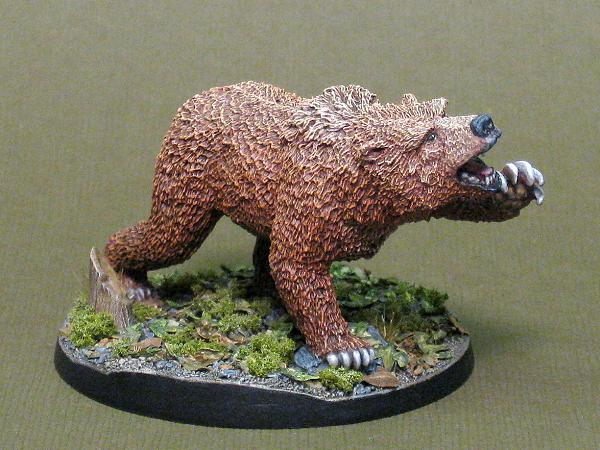
The cave bear was a more straightforward undertaking. Being mostly fur, he received the wash and drybrush treatment for the most part. In an attempt to achieve a more subtle effect, I gradually lightened the drybrushed color as I went higher on the body and did some glazing with the lightest color around his face and muzzle. The real detail painting was reserved for the mouth, eyes, and claws.


That's that. One basic, run of the mill, grey stone giant and his cookie-cutter sidekick. (Yawn.) In the end, I used some of the stone age symbols on the club and bag, and I still have the Olive skintone triad (Reaper made good on their mistake). Might work well on a hill giant I suppose.

I'll have to save my acts of apostasy against the old-school for another day it seems.

I wonder what a brick red fire giant would look like...

Thursday, May 6, 2010

Mission Accomplished

Success! (...I think.) The Otherworld trolls are done. It took longer than anticipated and maybe I should have done a few things differently but I'm happy with how they turned out. Pictures can be found here.

As for my "make it up as I go along" painting technique, I convinced myself that large scale drybrushing could produce satisfactory results despite all evidence to the contrary. In the end I may have been right, but a lot of glazing was required to soften the harshness of the drybrushing.

I took pictures as I went along. The first step, black undercoat:


Next, dark green basecoat:


Drybrushed with progressively lighter tones all the way up to straight yellow:


Green & yellow ink wash:


More drybrushing, this time taking it all the way to white:


More ink, a lighter application this time:


Extensive glazing with Scorpion Green (GW) in an attempt to tie everything together:


Some glazing with Golden Flesh (Reaper) and Warlock Purple (GW):


Additional details:

Thursday, April 22, 2010

Go Green

Happy Earth Day y'all. To commemorate this most holy of holidays I generally hug a tree or sing carols in front of Al Gore's house. This year I'm breaking with tradition and striping the paint off an old miniature instead. I've read tutorials on the subject but, prior to my current experiments, have never attempted it.

"Am I missing something?", you wonder. "How is this in any way related to Earth Day?", you ask. Well, if you'd quit butting in with so many questions, I'll tell you. The Earth Day tie-in lies in the fact that I'll be using Simple Green, an eco-friendly cleaning product, rather than one of its harsher alternatives.

Today's test subject is this Ral Partha miniature acquired via eBay as part of a lot auction, fittingly encased in a thick coat of kelly-green enamel. A trial-run on a couple of the less desirable minis from the lot yielded satisfactory results. I'll repeat the method and hope for a similar outcome.

The procedure used was as follows:
  1. Pour enough Simple Green into a metal can to cover mini
  2. Place mini into can
  3. Cover can and and allow to soak for 2 days
  4. Use a stiff brush, toothpick, and running water to remove paint
  5. Repeat steps 2-4 until desired results are achieved
This is how our subject looks after 3 baths. Not too bad. I initially used an old toothbrush to remove the paint but later supplemented this with a vegetable brush. Its longer, stiffer bristles seemed well suited to the task at hand. A toothpick proved useful in picking paint out of otherwise inaccessible recesses. A strainer in the sink is recommended so that any slip-ups won't result in a mini disappearing down the drain.

Well, I'm off to spend the rest of this Earth Day painting trolls and contemplating my carbon footprint. Hopefully I'll have more to report on the trolls in time for my next post.